This article goes through the basics of using your RecMic II Series.
Getting Familiar with the Device
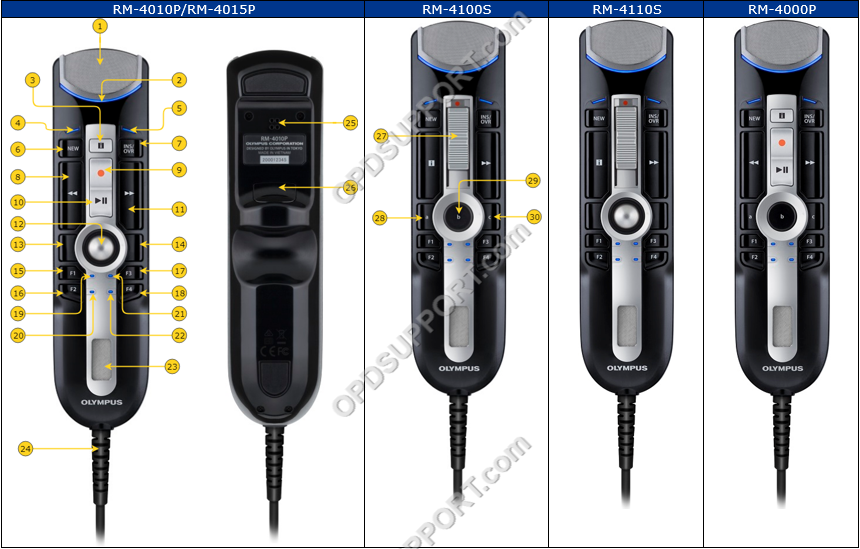
| 1 Primary microphone |
16 F2 (Function 2) button |
| 2 Recording three colour LED (red, green and blue) |
17 F3 (Function 3) button |
| 3 Insert index mark |
18 F4 (Function 4) button |
| 4 NEW LED (blue) |
19 F1 LED (blue) |
| 5 INS/OVR LED (red) |
20 F2 LED (blue) |
| 6 NEW button |
21 F3 LED (blue) |
| 7 Insert / Overwrite button |
22 F4 LED (blue) |
| 8 Rewind button |
23 Built-in speaker |
| 9 Record button |
24 USB cable |
| 10 Play/Pause button |
25 Secondary microphone |
| 11 Fast Forward button |
26 Back button |
| 12 Trackball |
27 Slide Record/Stop/Play/Review switch |
| 13 Left button |
28 A (Function a) button |
| 14 Right button |
29 B (Function b) button |
| 15 F1 (Function 1) button |
30 C (Function c) button |
How to create a dictation
- With the Olympus software open, press the “NEW” button on the RecMic to open the Direct Recording Window.

- Push the slide switch to the “REC” position and start dictating.
- To pause a dictation, move the slide switch back to the “STOP” position.
- To resume dictating, move the slide switch back to the “REC” position. This will continue with the same dictation.
Overwriting a dictation
- Move the slide switch into the “REV” position, this will rewind into the dictation.
- Press the “INSERT/OVER” button to select the required mode.To overwrite ensure the overwrite icon is displayed.

- When you reach the beginning of the section you want to overwrite, move the slide switch into the “REC” position.
Inserting a dictation
- Move the slide switch into the “REV” position, this will rewind into the dictation.
- Press the “INSERT/OVER” button to select the required mode. To insert additional recordings into a dictation ensure the insert icon is displayed.

- When you reach the beginning of the section you wish to begin the insertion, move the slide switch into the “REC” position.
Partial erase a dictation
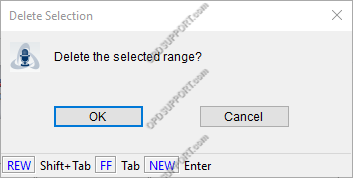
- Slide the record duration bar to the start point of where you want to erase the file and click Start partial erase.

- Next slide record duration bar to the end point of where you want to erase the file then click execute partial erase

- You will be prompted to confirm the partial erase click OK to continue or click Cancel to quit the partial erase.
Ending a dictation
- If you want to end the dictation select one of the options Finished, Pending or Cancel.

- If you have finished the recording, click Finished this will prompt you to name the file and select a folder to save the recording to.
- If you want to continue the recording later click Pending and this will save the file to the recording folder for you to come back to.
- If you want to quit the recording, then click Cancel and you will be prompted if you wish to save the file.
- If you click Save you will prompted to select either Finished or Pending and save the file accordingly.
- If you click Cancel this will delete the recording.
How to create a dictation
- With the Olympus software open, press the “NEW” button on the RecMic to open the Direct Recording Window.
- Press the “REC” button and start dictating.
- To pause a dictation, press the “PLAY/PAUSE”
- To resume dictating, press the “REC” position. This will continue with the same dictation.
Overwriting a dictation
- Press the “REW” position, this will rewind into the dictation.
- Press the “INSERT/OVER” button to select the required mode. To overwrite ensure the overwrite icon is displayed.
- When you reach the beginning of the section you want to overwrite, press the “REC” position.
Inserting a dictation
- Press the “REW” position, this will rewind into the dictation.
- Press the “INSERT/OVER” button to select the required mode. To insert additional recordings into a dictation ensure the insert icon is displayed.
- When you reach the beginning of the section you wish to begin the insertion, press the “REC” position.
Partial erase a dictation
- Slide the record duration bar to the start point of where you want to erase the file and click Start partial erase.
- Next slide record duration bar to the end point of where you want to erase the file then click Execute partial erase.
- You will be prompted to confirm the partial erase click OK to continue or click Cancel to quit the partial erase.
Ending a dictation
- If you want to end the dictation select one of the options Finished, Pending or Cancel.
- If you have finished the recording, click Finished this will prompt you to name the file and select a folder to save the recording to.
- If you want to continue the recording later click Pending and this will save the file to the recording folder for you to come back to.
- If you want to quit the recording, then click Cancel and you will be prompted if you wish to save the file.
- If you click Save you will prompted to select either Finished or Pending status and save the file accordingly.
- If you click Cancel this will delete the recording.
Sending your dictations
Once you have created your recordings you can send them via the following methods. The ODMS R7 software has automated functions which can be configured for a seamless workflow.
Further information
If you want to know about the Olympus software please take a look at the ODMS R7 GUI Overview
